参考教程
中文:
burpsuit实战指南
官网:
burpsuit 官网
帮助
点击设置项旁边的'?'按钮可以得到相关章节的帮助。或者点击最上面菜单栏中的Help可以查看一些帮助文档。
启动
java -jar -Xmx2G BurpLoader.jar
浏览器设置Burp suite代理
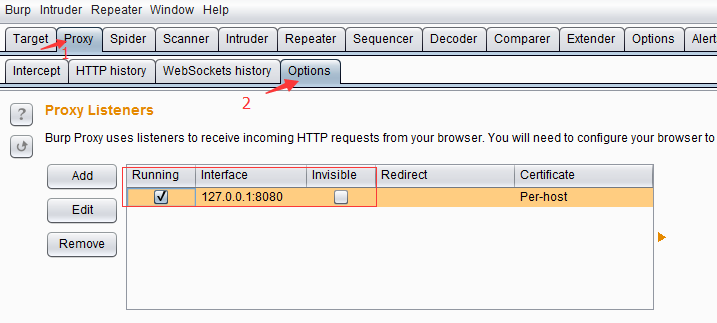
当Burp Suite 启动之后,默认分配的代理地址和端口是127.0.0.1 :8080,我们可以从Burp Suite的proxy选项卡的options上查看。如图:

然后在浏览器中把这个代理127.0.0.1:8080加入就好了~
我的配置:firefox是直接在高级选项中的设置代理中加的,chrome是SwitchySharp添加的代理。
为浏览器设置CA证书
参考:为浏览器设置CA证书 firefox有自己的CA证书库,而chrome没有,默认使用系统的CA证书库。
删除CA证书
对IE和chrome来说直接在Internet Options->Content->添加Certicaficates中删除名为PortSwigger CA的那个证书就可以了。
Testing Workflow
The diagram below is a high-level overview of the key parts of Burp's user-driven workflow.

Proxy选项卡
在Intercept副选项卡中选择Intercept is on,开始拦截。然后不断选择Forward将拦截的每一条消息发出,在下面的对话框中可以修改。
在HTTP history中可以查看history(序号越大越latest),然后在下面的Request和Response中可以看到该消息发送和应答信息。
在options中可以设定自定义的Proxy Listeners:
参考:Proxy监听设置
options副选项卡中的Intercept Client Requests和Intercept Server Responses可以指定intercept某些具体的消息。可以指定domain name, IP address, protocol, HTTP method, URL, file extension, parameters, cookies, header/body content, status code, MIME type, HTML page title, Proxy listener port. You can configure rules to only intercept items for URLs that are within the target scope(比如可以直接指定一个IP address, is in range, 10.3.8.211). Regular expressions can be used to define complex matching conditions for each attribute.
Target选项卡
这是站点地图模块。在Site map复选项卡中可以看到所有被Spider模块扫描后记录的所有站点访问消息。
site用树形结构展示,方便查看。
点击某个site->右键->add to scope可以直接加到右边Scope复选项卡中(但要记得先把Scope中包含该条的scope删除,不然右键只能看到remove from scope)同时右键中还可以看到有Spider this host等功能。
参考:如何使用Burp Target
在Scope副选项卡中可以编辑scope,然后这个scope是用来在site map的filter中使用的(还可以在Spider中使用),在site map中,点击对话框最上面的filter,选择Filter by request type中的show only in-scope items.
Suite Functions
在site map选择一个site,右键->Engagement tools可以看到相关的Suite Functions。
在site map的contents选择一项,右键->Engagement tools也可以看到相关的Suite Functions。
参考:Suite Functions
content discovery
选择site map上的一个site,右键菜单->Engagement tools->Discover content,然后会跳出新的窗口,可以查看discovery的信息,还可以设定一些规则配置。
Use the content discovery function to find further content that is not linked from visible content that you can browse to or spider.
参考:Content Discoverytarget Analyzer
选择site map上的一个site,右键菜单->Engagement tools->Discover content,然后会跳出新的窗口,可以查看分析出的URL结果。
需要注意的是即使分析结果是静态url,也只说明它在当前url中没有添加parameters,但是仍然有可能有parameters,仍然有可能是动态的。Task Scheduler
选择site map上的一个site,右键菜单->Engagement tools->Task Scheduler可以给任务设置开始、结束、间隔时间。Message Editor 红框标注的就是Message Editor
 在上面右键点击可以pass items between tools and carry out other actions.
Burp spider
Burp Spider is a tool for automatically crawling web applications. While it is generally preferable to map applications manually.
在Target->site map中选择要爬取的目标站点->右键->spider this host(可以先将该站点右键add to scope)
然后Spider就开始爬了(可以在Spider->control中看到爬取的状态)
点击Target->Site map对应的站点,在右边Contents中可以看到爬取的站点信息。
Spider->Options可以设置spider的爬取规则,包括设置爬行线程、爬行深度、请求头、表单登录等配置,参考:Spider可选项设置
Spider->Options中,Passive Spidering设置是否在你浏览的时候spider你浏览的url,一般肯定要选择的。
Active Spider(在站点中选择spider this host)的时候,可能需要手动填一些表单,可以选择填或者不填。在Control栏中的Spider Status的Forms queued中可以看到还剩几个表单要填。
Burp Scanner
- 针对单一的Url进行测试: proxy拦截请求之后,选择Action->Do an active scan进行主动扫描。
- 进行全站扫描 首先可能需要spider先爬行网站的所有链接。爬行完毕后,在Target模块中选择需要进行扫描的网站,右键->Actively Scan this Host->看到主动扫描向导->删除不需要扫描的网站->OK (Remove items with no parameters中所说的parameters仅包括url中的parameters,不包括head, cache等中的parameters)
- Active Scanning 在Scanner->Live scanning中可以配置。 Active scan will send various malicious requests designed to identify common vulnerabilities. Passive Scanning中描述Automatically scan the following targets as you browse,也包括spider爬取的链接。
scanning完了之后,返回Target->Site map->选择一个站点->查看最右边的Issues->对应Issues下面可以查看具体的(Advisory, Request, Response)->选中一个Issue, 下方Request/Response还会自动将对应部分高亮显示,点击右下角highlights可以直接跳到高亮部分。 在Issues中右键->还可以对误判的Issues修改危险等级,或置为误判。
在站点中右键->issues->report issues for this branch可以导出该站点的所有issues(可以用来写报告啦~) have a look at this video at youtube
Burp intruder
这个是Burp的特色。 在Target->Site map->选择一个站点->send to intruder,或者在Proxy中拦截一个消息->Action->send to intruder。 然后在Positions中利用Add $, Clear $等设置要添加的变量->在Payloads中的Payload Options中添加要intrude的字段,可以Add from list从burp给的list中添加->在Target选项卡中点击Start attack->然后可以在弹出的对话框中看到intrude结果(Status为200并且length跟其他的不一样的一般就是正确结果) 更多配置参照这个链接
Burp repeater
在Target->Site map->选择一个站点->send to repeater,或者在Proxy中拦截一个消息->Action->send to repeater。 然后在repeater中修改数据,再点击go发送出去。
恢复默认设置
Burp->User options->restore defaults
bugs
无法在chrome中添加信任的CA证书,因为chrome没有自己的信任库,只能在系统中设置(官网说chrome会自动读取系统设置的信任库)电脑右下角网络->Network and Sharing Center->Internet Options->Content->添加Certicaficates->选择添加到Trusted Root Certification Authorities。但是发现添加了还是不行,不知道问题在哪里。
books
The Web Application Hacker's Handbook 2